The way products are presented is key in the digital communication age, and this is especially true for pictures: data not only show how the quality of a picture influences the choice of a product or of a service, but also the attention the text description is given can be easily overshadowed in comparison to/with images.
To take a picture of an inanimate object – such as a piece of furniture – or to capture an interior may seem to be easy tasks. However, carefully planning the shooting session is key to do the products justice: this includes the set setting, the use of the appropriate equipment and an appealing styling.
The equipment
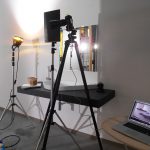
First of all, you want to make sure you’re using a good quality camera, with a reflex or a mirrorless system: you can either go for a state-of-the-art full frame camera or for a cheaper, semi-professional one with a smaller image sensor format. It depends on the budget you want to spend on your equipment, considering you’ll also have to add the proper lenses and a few more things, such as a tripod and a lighting kit.
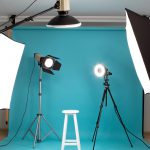
The tripod will avoid blurred pictures, and the spotlight will recreate the good lighting conditions. The basic kit usually includes two spotlights with their own adjustable tripods and one light spreader at least. Remember lighting is even more important than the camera is, when it comes to take a good interior design picture: if you take a look at some overexposed images, with harsh shadows distorting the subject, you will easily realize how important to have a good lighting is.
The set
The choice of the set depends on the kind of picture you want to take.
If the product has to be captured indoors, you’ll have to carefully plan the photo studio you set your set in. Pick the most suitable coverings for floors and walls with great attention, and also the good furniture and some props to make the ambient “cozier”. For a more realistic touch, just set a curtain with a light seeping through it on one side of the scene: this will give the illusion of a sun-lit window.
In the case you want to capture the image of an isolated product on a neutral background to have the details to stand out, have a white background ready – you can use a white bed sheet or a roll of paper. The background must have no visible gaps between the supporting base and the background.
If the object is totally white, you’ll have to set a black background – you want to make sure you’re using a light-absorbing surface, like velvet, to avoid any annoying glares. This trick will prove to be useful during post-production, as it will make block-out easier.
You now have to set the lighting, placing the two light sources at the two sides of the set. Just take a good look at it, to detect areas where shadows might be too harsh: you can point a reflector (any white surface will do) on the concerned area to light it up. You are now ready to shoot.
Adjusting the camera
As a start, you’ll have to set the ISO (sensitivity to light index) at 100: this will avoid the appearance of the peculiar “dotted effect”, better known as image noise, which happens on dark areas when the set ISO is too high.
Make sure you are selecting the manual shooting mode from the ferrule, so you can adjust the settings as you wish: the aim is to get the right exposure, which will be displayed on the viewfinder on the central point of a graduated scale.
Parameters to be set are the diaphragm opening and the shutter speed.
Furniture shooting is somewhat close to take/make a portrait, so the choice of the ottiche has to take this into account: if you use a focal between 50 and 150 mm you will have/get a picture with no perspective distortions and with the right proportions.
With the camera on the tripod, try your best to compose a balanced and harmonious composition. Before you actually shoot, be sure you like the result: in the case you don’t, move the objects and adjust the lighting until you’re happy with it.
Post-production
Editing is the final step of the process. This will give the final touches to your pictures, making them perfect and ready for circulation. You will need a image processing software for that: if dimensions need reducing, crooked photos need straightening and exposure and colour casts need adjusting, Lightroom is the perfect tool – mainly because it allows to bulk import, export and modify images.
In the case the pixels need adjusting, for example to block out an object that has to go on the catalogue (both on a paper or on a digital one), or to get rid of possible blemishes, the essential software to use is Photoshop.
One last piece of advice: before saving the final version of the picture, make sure the color profile is set on RGB in the case it goes online. If the picture is to be printed, color profile will have to be agreed upon with your printer.